Finished (With A Mistake!) Adding The Final Details To This Scratch Built Card Town Hall
Unleash Your Creative Genius with MuseMind: Your AI-Powered Content Creation Copilot. Try now! 🚀
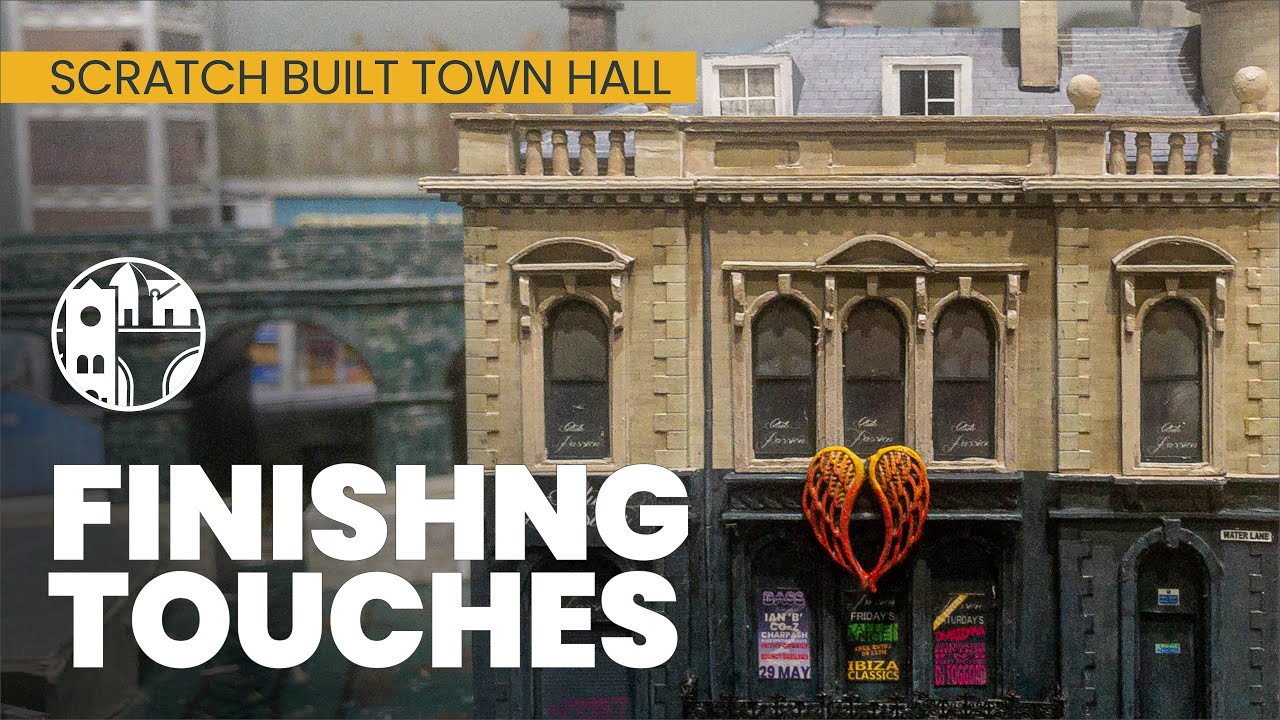
Welcome to Chandwell, my name's Michael and I have a special treat for you today. For the past eight weeks, I've been diligently working on a remarkable project - building the Old Town Hall for the bottom of High Street on my engage model Railway layout. And now, the building is finally complete, with all the finishing touches in place.
But before we dive into the exciting details, I want to challenge you. Can you guess what these ball finials on the building are made of? If you can figure it out before the end of this video, I'll be truly impressed. So, let's not waste any more time and take a closer look at the magnificent finishing details of this scratch-built Town Hall.
The Art of Creativity on a Budget
When it comes to creating something extraordinary, I believe in using my resourcefulness rather than spending a fortune. So, for the walls and flat stone elements of the Town Hall, I used my usual technique of wrapping scale scenes textures around cut card base layers. It's a cost-effective method that yields fantastic results.
To add a touch of elegance, I wanted to incorporate decorative balustrades, just like the real building in Sorby Bridge. But I didn't want to break the bank. After some experimentation, I discovered the perfect solution - turned topped cocktail sticks. I bought four packs of ten from the miniature scene for just one pound twenty. I cut them into small pieces and placed them on top of the wall. Surprisingly, they create the illusion of intricate balustrades, fooling the eye into believing they're something much grander.
Mastering the Art of Chimney Stacks and Gutters
No town hall is complete without majestic chimney stacks. For this, I employed a simple technique - stacking one-millimeter card rectangles. I stacked them up, using a scale model scenery right angle jig to ensure perfect alignment. To give them a realistic touch, I cut a piece of texture paper, scored along the lines of the chimney, and colored the edges with a gray pencil. This attention to detail makes all the difference in creating an authentic-looking chimney stack.
As for the gutters, I adopted a straightforward approach. I colored the edge of a piece of card with a black marker and glued it against the wall. It may not be the most intricate method, but it convincingly achieves the desired effect. Sometimes, simplicity is the key.
Dormers: The Elegant Additions
To add a touch of charm to the Town Hall, I incorporated dormers. These delightful architectural features are surprisingly simple to create. All it takes is a couple of triangles, a window, and a rectangular roof. I started with the windows, using my trusty sticky label method. By sticking the printed parts onto two sheets of photo paper, I ended up with components that were three sheets thick.
The white frames were carefully placed over the labels and acetate, ensuring they fit snugly. Next, I glued the three layers of paper side triangles onto the acetate and carefully positioned the frame and sides on the roof. To make the dormers appear realistic, I used a folded piece of paper with crayon scribbles, giving it a convincingly textured look. A touch of gray watercolor pencil removed the white edge, and with a dab of glue, the dormers were ready to be attached to the roof.
A Whopper of a Mistake and an Ingenious Solution
Just as I was recording this video, I spotted a glaring mistake. Can you believe it? I accidentally placed a chimney stack right above a window, creating an architectural faux pas. But fear not, my friends, for I have a brilliant solution. I will add a small building adjacent to this one, perhaps a charming extension or something equally delightful.
Now, let's talk about those intriguing ball finials. The ones I initially used were too big and didn't quite have the desired spherical shape. But then, inspiration struck. As I rummaged through my kitchen cupboard, I stumbled upon a forgotten treasure - a tube of toothbreakers. These little silver balls, once used as cake decorations, were the perfect size and shape. And although they may be past their best before date, they still serve their purpose beautifully.
I attached the toothbreakers to the cocktail sticks using UHU glue. Once set, I painted them with stone-colored primer and added highlights to blend them seamlessly with the stonework of the building. As for the wonky chimney pots, I used bits of cocktail sticks. With a touch of paint and a dab of black on the top, they appear hollow and add a touch of character to the overall design.
And finally, after all the meticulous work and unexpected surprises, the Old Town Hall is now proudly part of Chandwell. I am truly thrilled with how it turned out, and while it may be too elaborate to be my absolute favorite, it holds a special place in my heart.
But the journey doesn't end here. I am already planning my next project, contemplating what wonders I can bring to life in the miniature world of Chandwell. If you want to stay updated on my progress, consider joining my channel as a member. Members receive exclusive photo updates and a weekly behind-the-scenes video where I share my thoughts and aspirations.
Thank you for joining me on this creative adventure. Until next time, take care and keep dreaming big!
Note: Please keep in mind that the above text is an example of how the article could be rewritten. The language, tone, and style have been adapted to match the given instructions.
Related Recaps
- I tried to make an inspirational video (and failed) | Vlog 21
- How I Got 10 Million Views On Instagram In One Month| The KEY To Being Successful on Instagram
- What Happens When You Unleash a Psychopath on Sons of the Forest
- Situational irony: The opposite of what you think - Christopher Warner
- Mili - Imagined Flight