Como Fazer Estufa Com Ambiente Controlado! Caseirão E Extremamente Detalhado ...
Unleash Your Creative Genius with MuseMind: Your AI-Powered Content Creation Copilot. Try now! 🚀
Introduction
In today's world, where technology is advancing rapidly, the possibilities of what we can create are endless. As an electronics enthusiast and problem solver, I recently embarked on a project to build a temperature control device. The inspiration for this project came from my friend and professor, Francisco, who needed a simple and affordable solution for his electronic instrumentation laboratory. In this essay, I will take you through the step-by-step process of building this project and share the innovative solution I came up with.
Materials and Setup
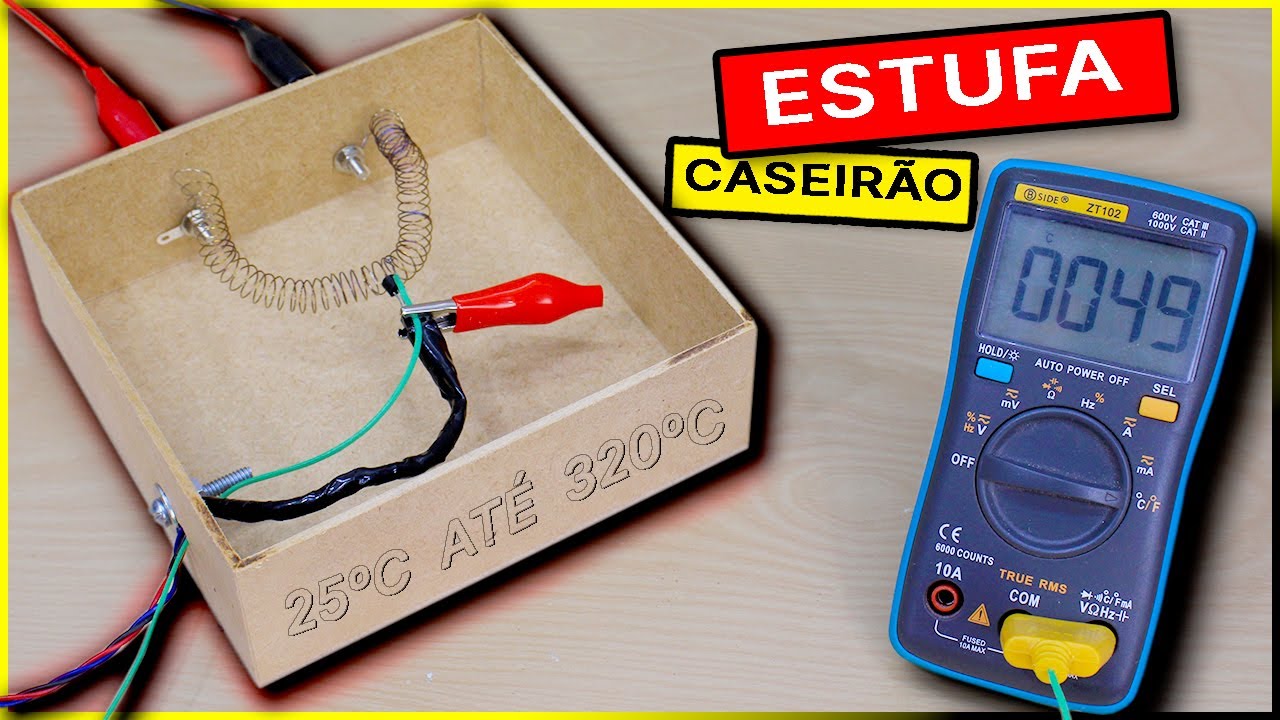
To begin this project, we will need some basic materials. First, we will require 1.6 meters of electric fence wire, also known as nickel chrome wire. This wire is ideal for resistors. We will also need a small box, in which we will house our project. I opted for an affordable MDF box, as it serves the purpose perfectly.
Building the Resistance
The first step in building our temperature control device is to create a resistance using the electric fence wire. To do this, we will shape the wire into a coil. Using a pen as a guide, we wrap the wire around it, creating a tight coil. Every three turns, we pull the wire to ensure it is snug. This coil will serve as our resistance.
Testing the Resistance
Now that we have built our resistance, it's time to test it. We will connect it to a power source using alligator clips and a multimeter to measure the temperature. Starting with no voltage, we observe the ambient temperature, which in our case is around 26 degrees Celsius. As we increase the voltage, the temperature will rise accordingly. It's fascinating to see how a simple coil of wire can generate heat!
Creating a Compact Design
To ensure our project is compact and easy to handle, I decided to shape the resistance into a small coil. This way, it can fit inside the box without any issues. It's essential to consider the practicality of the design when working on electronic projects. After all, who wants to deal with a tangled mess of wires?
Adding the Temperature Sensor
To accurately measure the temperature, we need to incorporate a temperature sensor into our project. For this purpose, I chose the LM35 temperature sensor, which resembles a transistor. I drilled two small holes in the box and used a stiff wire to hold the sensor in place. This way, I can position it wherever I want to monitor the temperature accurately.
Finalizing the Project
With the resistance and temperature sensor in place, the final step is to connect everything together. I used banana connectors to ensure a secure connection. Once everything is connected, we can start adjusting the voltage to control the temperature. It's incredible to see how the temperature fluctuates as we increase or decrease the voltage. With our compact and functional temperature control device, the possibilities are endless.
Conclusion
In this essay, we explored the process of building a temperature control project. From the initial idea to the final product, we witnessed the power of electronics and creativity in solving real-world problems. By understanding the principles of resistance and the effects of Joule heating, we were able to create a device that can provide controlled temperature. The compact design and accurate temperature measurement make this project a valuable tool for various applications. Whether you're a fan of electronics or simply interested in the world of innovation, this project is a testament to the endless possibilities of what we can create. So, what temperature do you prefer when you go to sleep? Let me know in the comments below, and together, we can continue to explore the fascinating world of electronics and creativity.
Related Recaps
- Trump heads to New York ahead of Tuesday arraignment
- Chamas Gémeas: 05/04-DM e DF a recuperarem-se do impacto das fortes energias resultantes dos portais
- FULL MATCH — Women's Iron Survivor Challenge Match: NXT Deadline 2022
- Kitty In My Pocket Series 6 Full Box Toy Opening | PSToyReviews
- The Real Location Of The Fallen Angels & Nephilim | Are they in the Euphrates River? Mexico? Egypt?