Diy: Modern (Sunken) In Ground Fire Pit
Unleash Your Creative Genius with MuseMind: Your AI-Powered Content Creation Copilot. Try now! 🚀
Introduction: Unleash Your Creativity and Fire Up Your Backyard
Hey there, fellow YouTube community! If you've been following my videos lately, you know that I'm all about those DIY projects. And in today's video, I've got something special for you: a step-by-step guide on how to create your very own custom modern-style fire pit. But hold on tight, because this is no ordinary fire pit. We're talking about an in-ground, natural wood-burning masterpiece that will take your backyard to the next level. So grab your tools, roll up your sleeves, and let's get started!
Section 1: Mapping Out the Perimeter
The first thing you need to do is map out the perimeter of your fire pit. Now, I must warn you, my yard is on a slope, so I had to level out the whole area before I could even think about getting started. And let me tell you, this part took some serious digging. But hey, we're not here to take the easy road, right? We want our fire pit to be as level as possible, so it's worth the effort.
Section 2: Digging Into the Details
After several hours of intense digging, we finally have a level ground to work with. But guess what? We're not done with digging just yet. Oh no, my friend. Now it's time to dig up the actual base for the seating area. We want this fire pit to be the epitome of modern style, so attention to detail is key. The base of the seating area needs to be about eight inches deep, just tall enough to accommodate the cinder blocks we'll be using for the walls. Don't worry, it's a straightforward process. Just dig, dig, and dig some more.
Section 3: Laying the Foundation
Now that we have the seating area sorted, it's time to set the perimeter of cinder blocks for the base. And here's where things get interesting. I set up a level string line to guide me in placing the blocks. Double-checking for levelness, I repeated the steps on two other sides, leaving one side open. Why, you ask? Well, let's just say I ran out of materials and had to make a quick trip to the store. But hey, even the greatest DIYers face setbacks, right?
While waiting for my supply run, I decided to dig the actual pit of the fire pit. I wanted it to be a perfect rectangle, mirroring the shape of the fire pit area itself. The dimensions? Three feet by two feet, nothing too crazy. And of course, the depth had to be a solid ten inches. But let me tell you, the soil was getting tougher to dig through. I had to channel my inner strength and call it a day for now.
Section 4: Adding the Finishing Touches
As I started pouring the sand into the pit, a realization hit me like a ton of bricks (or in this case, sand). I had forgotten a crucial step. Since the pit is below ground level, it needs a source of oxygen to keep the fire burning. Enter the dryer tube extension. This nifty little contraption would bring fresh oxygen to the bottom of the fire pit, ensuring a roaring fire. Crisis averted!
With the sand poured and the oxygen situation under control, it was time to work on the base of the fire pit once again. First, I poured an inch of sand and tamped it down, making sure it was perfectly level. Then, I added a couple of inches of gravel, leveling it out as well. This is where the brick perimeter of the pit would sit, so attention to detail is key.
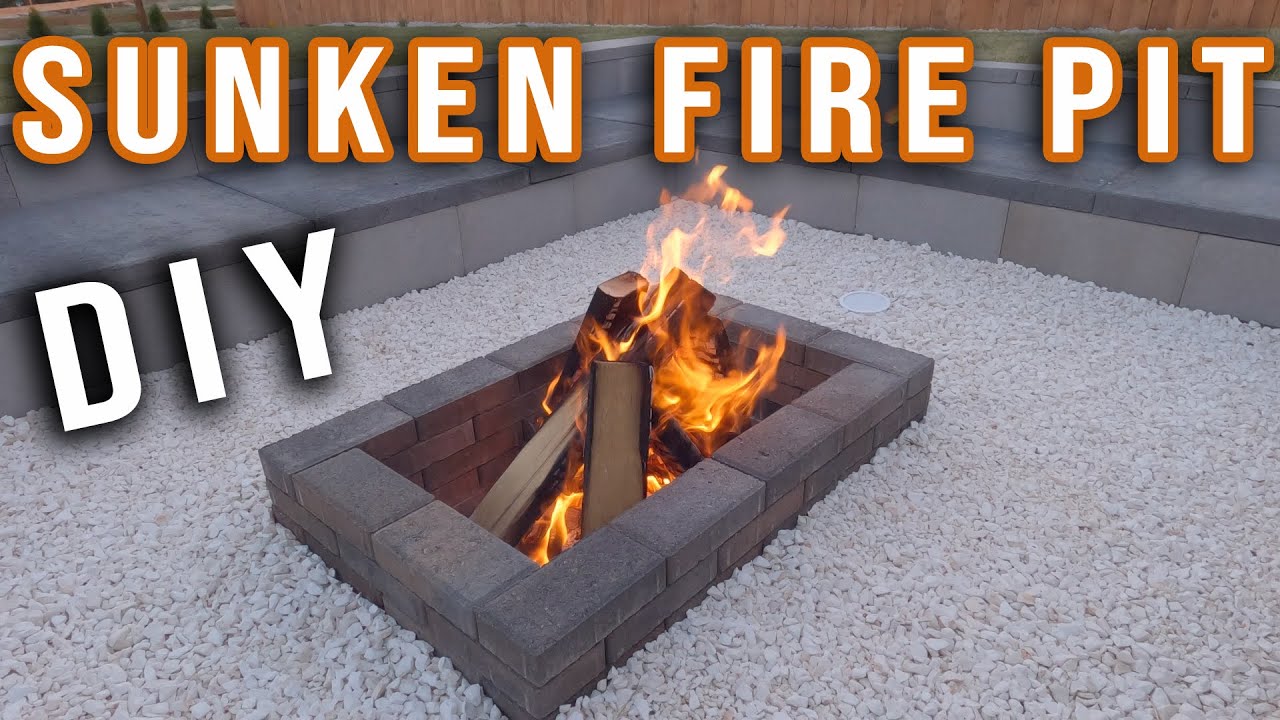
Using concrete adhesive and bricks, it was time to lay out the perimeter. I staggered each row for both structure and style. And of course, I made sure that everything was level row by row. The end result? A fire pit that looked absolutely stunning from every angle. I couldn't help but admire my handiwork.
Section 5: The Final Flourish
After giving the fire pit a good 24 hours to dry, it was time to add the finishing touches. I poured lava rock into the bottom, creating a visually striking base for the fire. And then, it was time to focus on the seating area. I used huge concrete tiles, each weighing a whopping 90 pounds. Talk about heavy-duty stuff! But hey, it matched the style of my patio, so it was well worth the effort.
After tamping down the area and adding some sand for leveling, it was finally time to lay down those concrete pavers. And let me tell you, they fit like a glove. It was a tight fit, but that's what we want, right? We also laid down a weed barrier for good measure. We don't want any unwanted guests popping up between our pavers, do we?
But wait, there's more! I couldn't resist adding backrests to the fire pit. Using the trusty cinder blocks, I created a perimeter for the backrest. It's not too tall, but just the perfect height to sit level with the ground once the sod is installed. And of course, I used a level string line to ensure everything was in place.
With the blocks in place and the perimeter backfilled, it was time to put the caps on top of the cinder blocks. These caps were slightly wider than the blocks, giving it a sleek and polished look. Oh, and did I mention the small step down from the grass to the seating area? That's right, I left the entryway open for a seamless transition. Gluing the caps together provided a barrier for the grass and a stylish step down.
Conclusion: Celebrate Your DIY Triumph
And just like that, my friends, the project is complete. Congratulations! You've built your very own modern-style fire pit from scratch. Sit back, relax, and bask in the warmth of your creation. Invite your friends over, toast some marshmallows, and enjoy the magical ambiance that only a homemade fire pit can provide. Remember, the journey is just as important as the destination. So embrace the labor-intensive process, have fun with it, and let your creativity shine. Happy DIYing, my fellow fire pit enthusiasts!
[Applause]
Related Recaps
- Montez votre ALPINE A110 1600S 1/8 box 12 étape 45/48 @IXOCOLLECTIONS
- Extradición de Alejandro Toledo: ¿Por qué se entregó en otra sede judicial en Estados Unidos?
- दोबाटे | Dobate Episode 414 | 5 May 2023 | Comedy Serial | Dobate | Nepal Focus Tv | By Harindra
- It's an important verdict for women out there who are suffering: Lawyer on E. Jean Carroll verdict
- 5 Things To Remember During Tough Days